Backlighting is a powerful technique in photography that involves positioning the main light source behind the subject. This approach can add depth, drama, and a sense of three-dimensionality to your images. By mastering backlighting, photographers can create captivating photos that stand out.
Understanding Backlighting in Photography
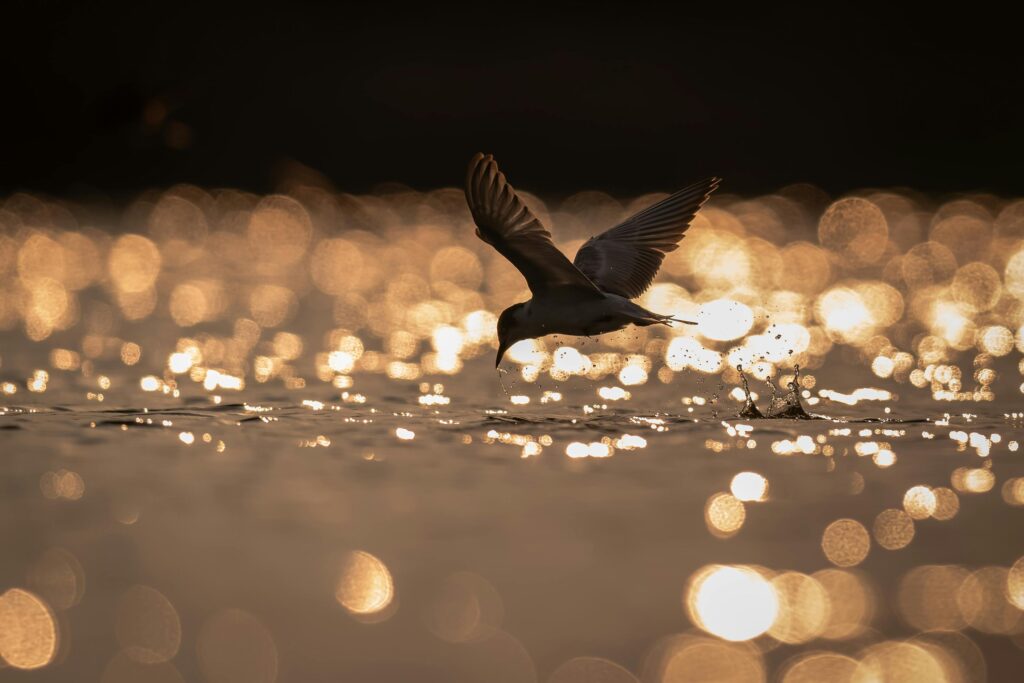
Backlighting occurs when the primary light source is placed behind the subject, facing the camera. This setup can produce various effects, such as silhouettes, rim lighting, and enhanced textures. The key is to control the exposure and composition to achieve the desired outcome.
Effects of Backlighting
- Silhouettes: By exposing for the bright background, the subject appears as a dark shape, creating a striking contrast.
- Rim Lighting: A subtle glow outlining the subject, emphasizing its shape and adding depth.
- Enhanced Textures: Backlighting can highlight textures, such as hair or foliage, by illuminating them from behind.
Techniques for Effective Backlighting
1. Choosing the Right Time of Day
The golden hour—shortly after sunrise or before sunset—provides soft, warm light ideal for backlighting. During this time, the sun is low in the sky, reducing harsh shadows and creating a pleasing glow.
2. Positioning the Light Source
Place the light source directly behind the subject. Experiment with angles to achieve different effects, such as partial backlighting for a rim light or full backlighting for silhouettes.
3. Adjusting Camera Settings
- Aperture: A wider aperture (e.g., f/2.8) can create a dreamy background blur, while a narrower aperture (e.g., f/11) keeps more of the scene in focus.
- Shutter Speed: Faster shutter speeds can prevent overexposure from the bright background.
- ISO: Keep ISO low (e.g., 100-400) to minimize noise, increasing it only if necessary.
4. Using Fill Light
To prevent the subject’s front from appearing too dark, use a reflector or fill flash to bounce light back onto the subject. This technique balances the exposure and retains detail in the shadows.
5. Managing Lens Flare
Lens flare can add artistic flair but may also distract from the subject. To control flare:
- Use a lens hood to block stray light.
- Adjust your shooting angle to minimize direct sunlight entering the lens.
- Shield the lens with your hand or an object.
Common Questions About Backlighting
How do I expose a backlit subject correctly?
Use spot metering to measure the light on the subject’s face or the area you want properly exposed. Adjust exposure compensation as needed to brighten the subject without overexposing the background.
Can backlighting be used indoors?
Yes, backlighting can be achieved indoors by placing the subject in front of a window or using artificial lights behind the subject. Ensure the background light is diffused to avoid harsh contrasts.
What are some creative uses of backlighting?
- Silhouettes: Create dramatic images by exposing for the bright background, rendering the subject as a dark shape.
- Rim Lighting: Highlight the edges of the subject to separate it from the background.
- Sun Flares: Introduce artistic flares by allowing sunlight to enter the lens intentionally.
Advanced Backlighting Techniques
Silhouette Photography
To create silhouettes:
- Position the subject directly between the camera and a strong light source.
- Expose for the background, allowing the subject to appear dark.
- Use a narrow aperture (e.g., f/8) to keep both the subject and background in focus.
Rim Lighting
For rim lighting:
- Place a light source behind and slightly to the side of the subject.
- Adjust the angle to create a glowing outline around the subject.
- Use a reflector to add fill light to the front if needed.
Sun Flare
To incorporate sun flare:
- Shoot during the golden hour with the sun low in the sky.
- Position the sun just outside the frame or partially obscured by the subject.
- Experiment with different angles to achieve the desired flare effect.
Conclusion
Mastering backlighting can elevate your photography by adding depth, drama, and visual interest. By understanding the techniques and experimenting with different settings, you can harness backlighting to create stunning images that captivate viewers.
For further reading on backlighting techniques, consider exploring this comprehensive guide on backlighting in photography: Backlighting in Photography: The Ultimate Guide.